đź’§ DIY RAINWATER INDEPENDENCE
A homeowner-led guide for DIYers everywhere

One website. Many properties. Rainwater plans that fit.

Every home has a different roof, layout, climate, downspout pattern, available space and budget. Explore practical options, learn from my 2,200-gallon Oklahoma project, and build a plan around your own property—not someone else’s blueprint.

The project shown here is one real homeowner’s example. Your best solution may be smaller, larger, phased, or arranged completely differently.

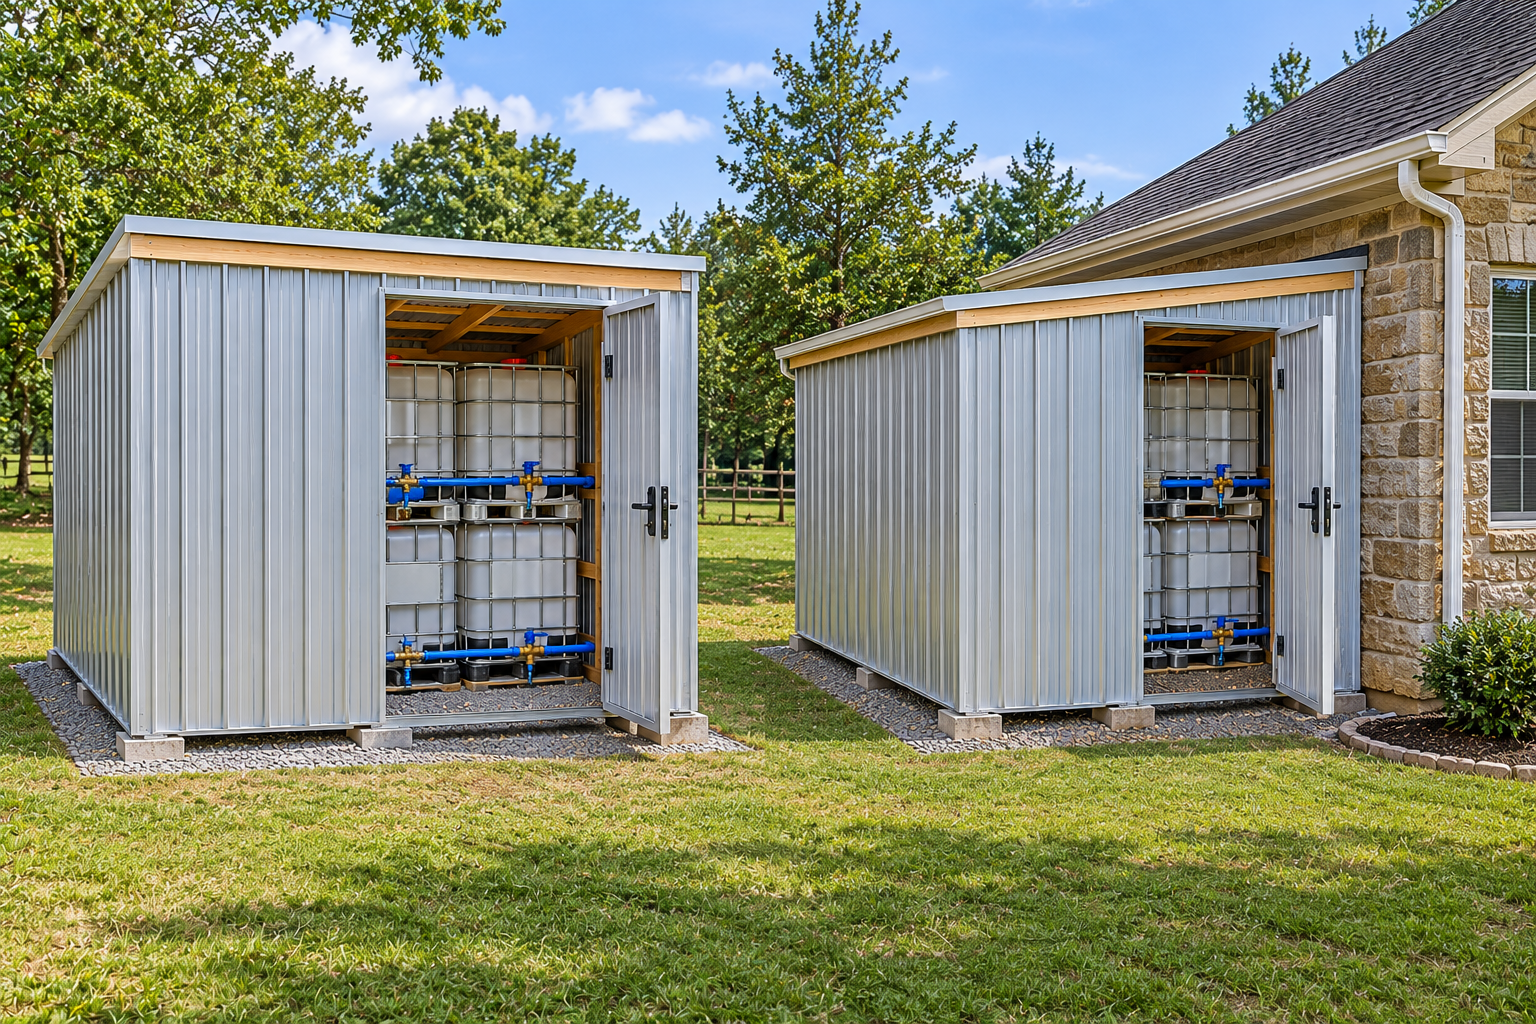
Illustrative comparison of a standalone metal rainwater shed and a lean-to shed beside a stone houseConcept rendering comparing two possible shed approaches—not a photograph of a completed installation.
4 yearsOff municipal tap water, as reported in my blueprint
2,200 galEight nominal 275-gallon IBC totes
7Roof downspout collection locations
44 galSecondary pressure tank
Our guiding principle

Design around the homeowner’s property—not the other way around.

There is no single rainwater system that fits every house. The right plan depends on the roof, house orientation and structure, rainfall, downspout locations, terrain, soil, available space, water needs, local rules and budget. This website helps visitors compare choices and develop a preliminary plan that fits their own circumstances.

Learn from a real project

My Warner, Oklahoma project is a detailed case study: an approximately 2,200-square-foot roof, seven downspout collection locations, an eight-tote 2,200-gallon central reservoir, additional remote totes, a pump and pressure tank, and a shed designed around the equipment.

It is an example to learn from—not a template every visitor should copy.

Explore my project

Compare practical choices

Visitors can compare standalone and lean-to sheds, different tank arrangements, direct collection and remote transfer, insulation approaches, pumping options and ways to expand storage over time.

A lower material cost is not automatically the safest or best choice; house attachment, site conditions, maintenance access and local loads matter.

Compare shed designs

Build a plan in stages—at your own pace

1 · UnderstandMap the roof, rainfall, downspouts, site and intended water use.
2 · ChooseCompare collection routes, storage sizes, shed types and budgets.
3 · StartBuild a manageable first phase with safe foundations, overflow and access.
4 · ExpandAdd tanks or remote collection points as needs and budget allow.
5 · MaintainInspect, clean, test water and prepare for seasonal conditions.
What this website promises: clear explanations, flexible choices, planning tools and lessons learned. It does not promise a one-size-fits-all design, guaranteed water supply, safe drinking water without testing and treatment, or construction details that replace local code review and qualified professional verification.
Why I built it

My experience is the starting point—not a promise that every property is the same.

My submitted blueprint says I have been completely off city tap water for four years and estimate that I have avoided about $100 per month in water bills—approximately $4,800 over that period. Those are my personal figures, not a typical savings guarantee.

What I want DIYers to learn

  • Plan the collection area and storage volume together.
  • Think through overflow, maintenance access and pump servicing before building the shed.
  • Protect the system from Oklahoma cold snaps with a complete insulated enclosure and a safe backup plan.
  • Keep water-quality testing and treatment separate from the plumbing and storage discussion.

My house and collection strategy

The project is based around a roughly 2,200-square-foot metal roof on a stone house in the Warner, Oklahoma area. One downspout feeds the main reservoir. At the other six downspout locations, I plan to keep at least two totes (and potentially more) and manually transfer water to the main reservoir when needed using a Ryobi P750 battery transfer pump.

The satellite totes are additional, distributed storage; they are not included in the central 2,200-gallon figure.

Whole-system overview

From roof runoff to household pressure

The design is a sequence: collect, screen, store, pump, pressurize, then treat water for the intended use.

1 · Metal roofApprox. 2,200 sq ft catchment area; gutters and seven downspouts.
2 · First-flush / screensRoof rinse routine and 400-mesh stainless screens described in my blueprint.
3 · StorageEight 275-gallon totes interconnected as a 2,200-gallon reservoir.
4 · Pump + tank1.6 HP shallow-well pump, built-in 5-gallon tank and secondary 44-gallon tank.
5 · HousePressurized distribution to the household network, with treatment matched to use.
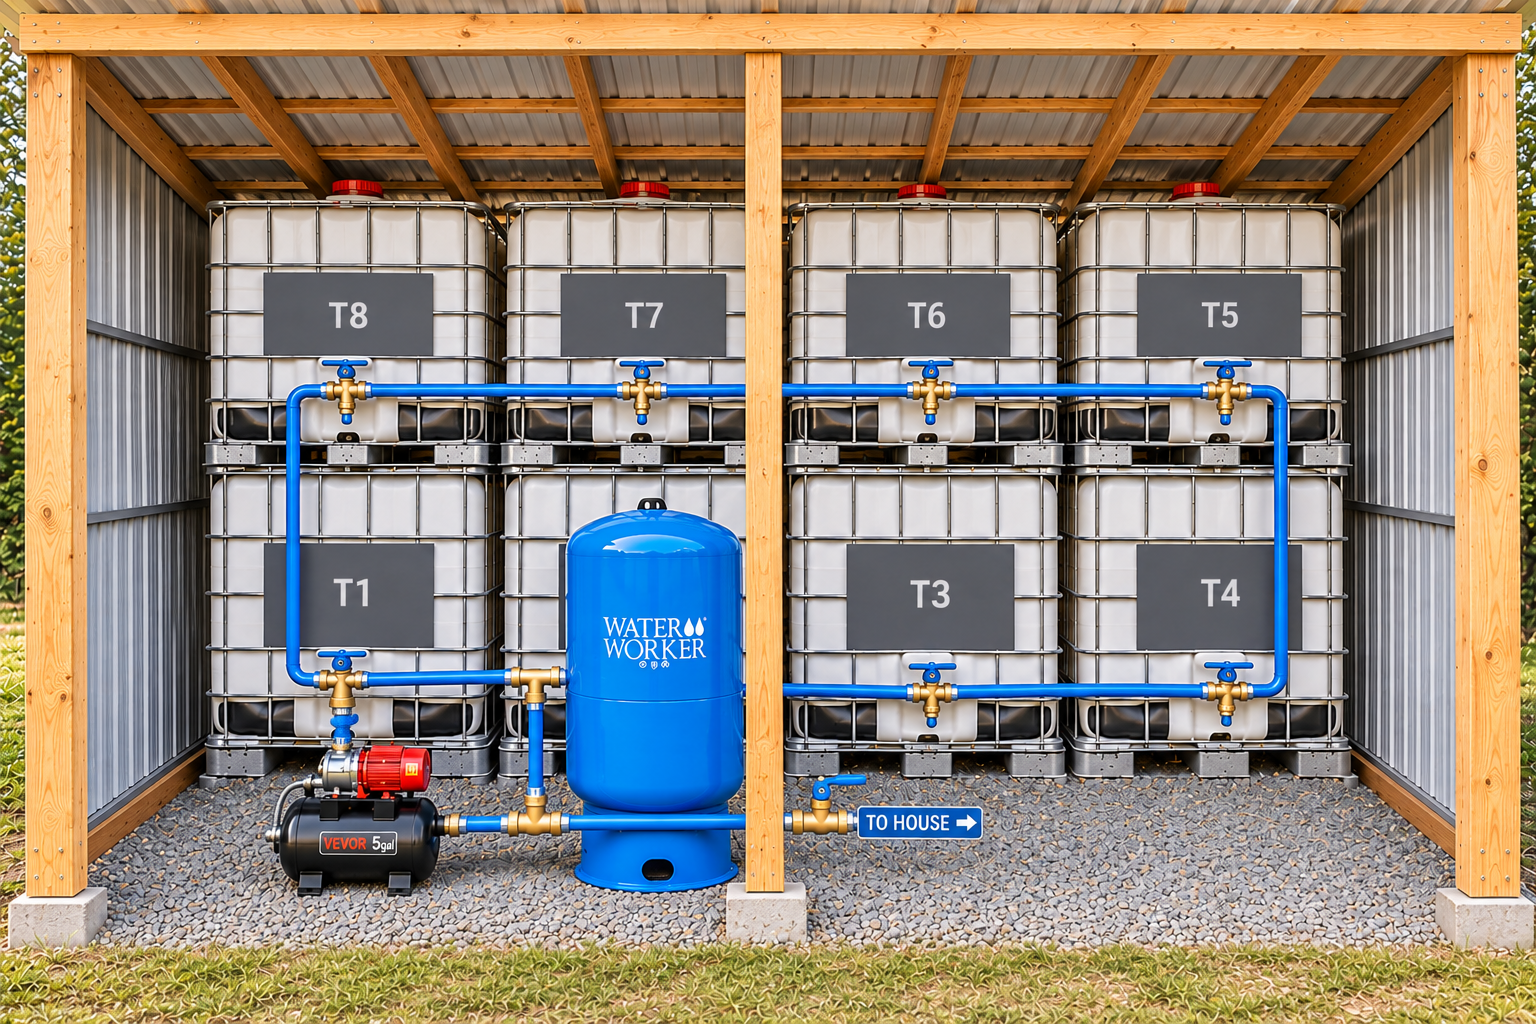
Illustrative interior layout showing eight IBC totes, blue manifold piping, pump and pressure tank
Reservoir and pump-bay conceptIllustrative rendering based on the design discussions; not a photograph of the completed shed.

How the seven downspouts fit together

  1. Main collection: one downspout is routed to the eight-tote central reservoir.
  2. Six remote locations: keep two or more totes at each of the other six downspouts, as site space allows.
  3. Manual transfer: use the Ryobi P750 battery pump and suitable hoses to move stored water to the main reservoir as needed.
  4. Overflow: direct every tote overflow away from the shed, house foundation and neighboring property.
Confirm the exact tote count, transfer hose size, pump duty cycle and lift/flow limits from the Ryobi manual before relying on the battery pump for routine transfers.
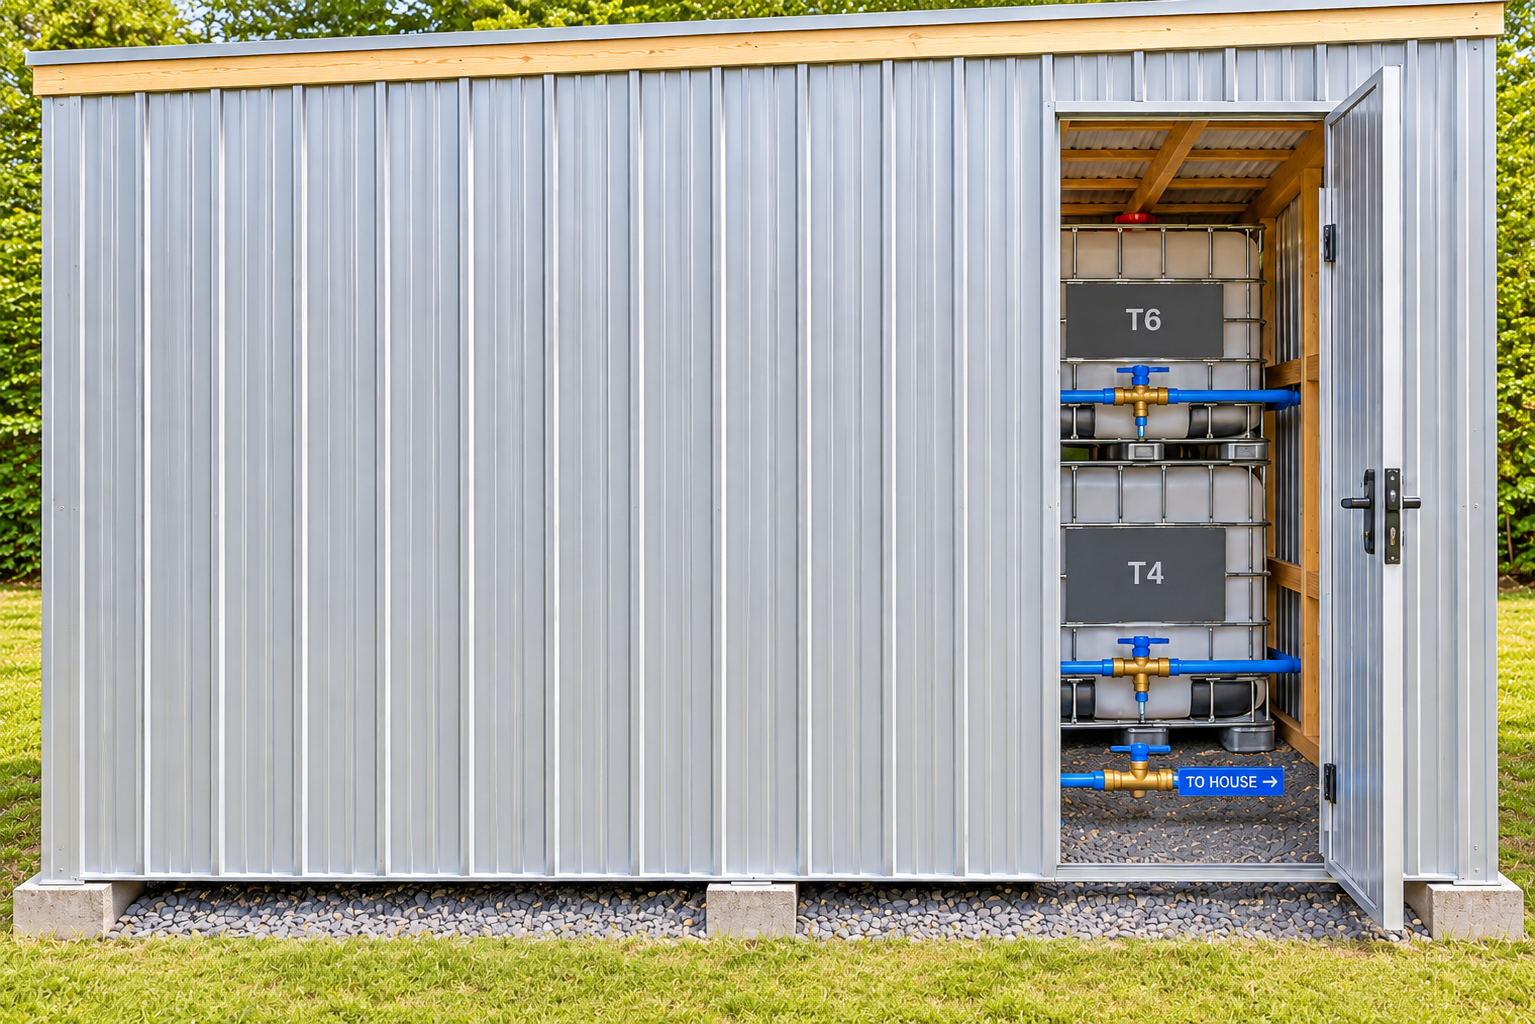
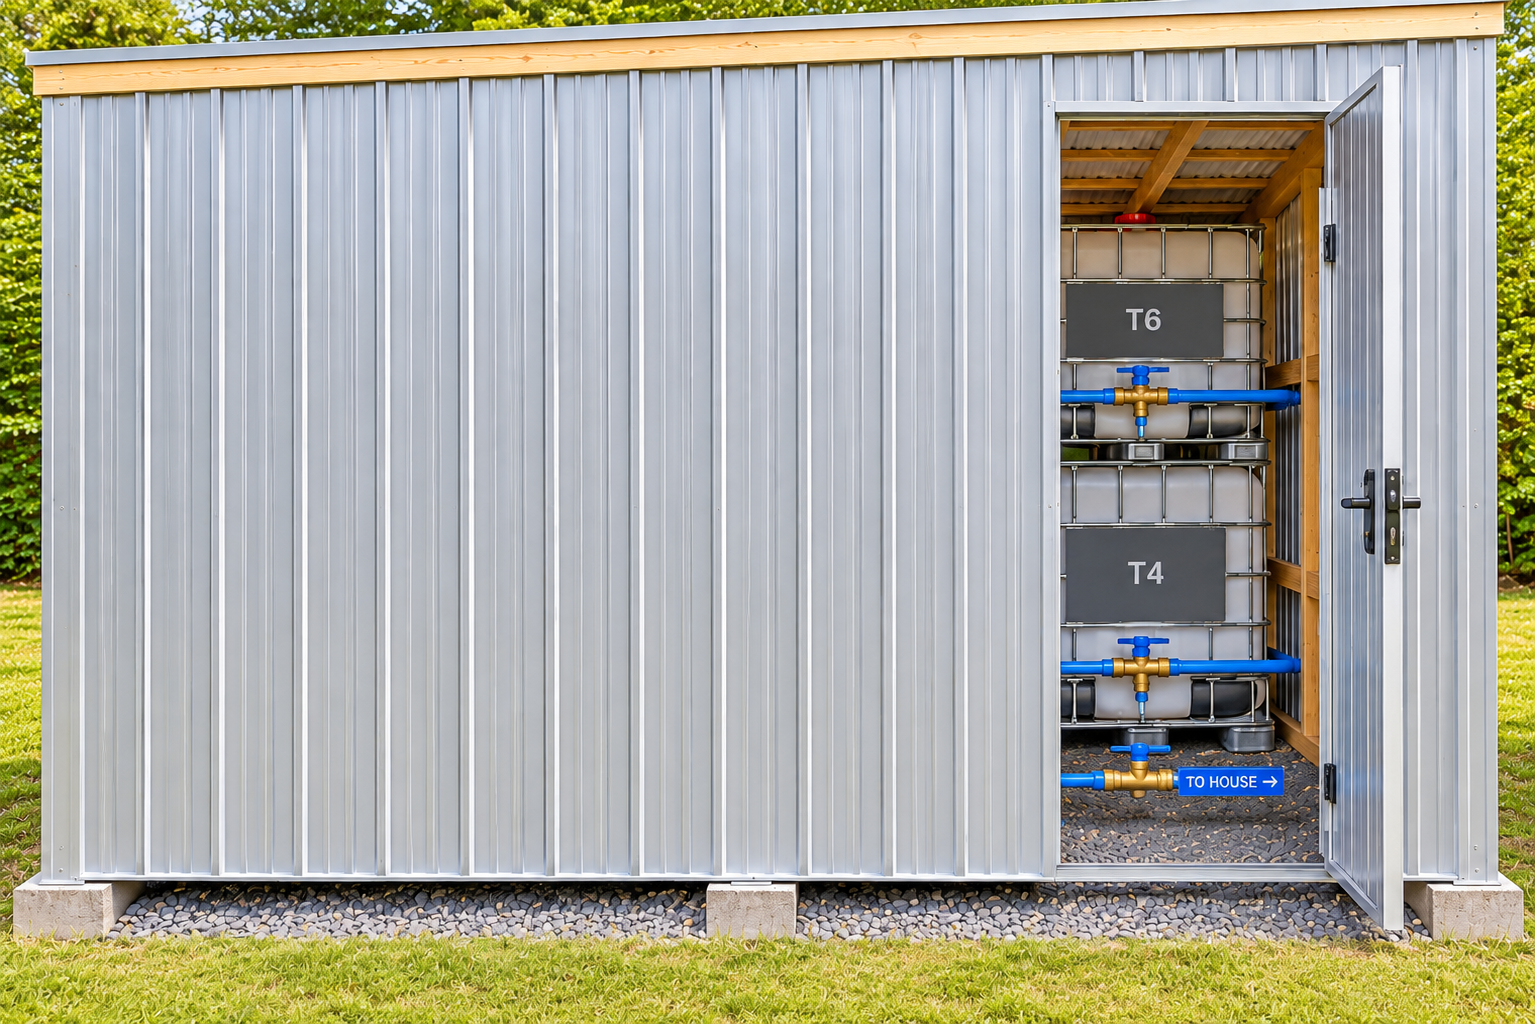
Concept rendering of a metal-clad utility shed with a narrow right-side maintenance door
Enclosed shed and narrow service-door conceptIllustrative exterior concept showing the small right-side maintenance door; not a photograph of the completed build.

Central reservoir manifold and pump sequence

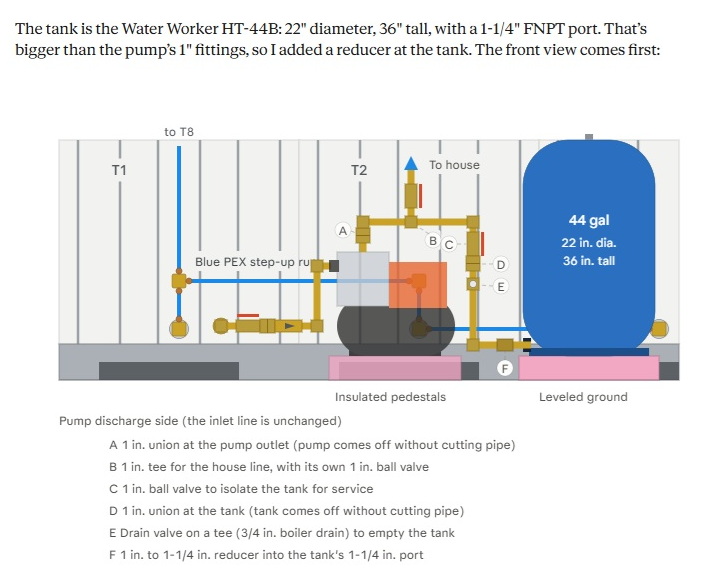
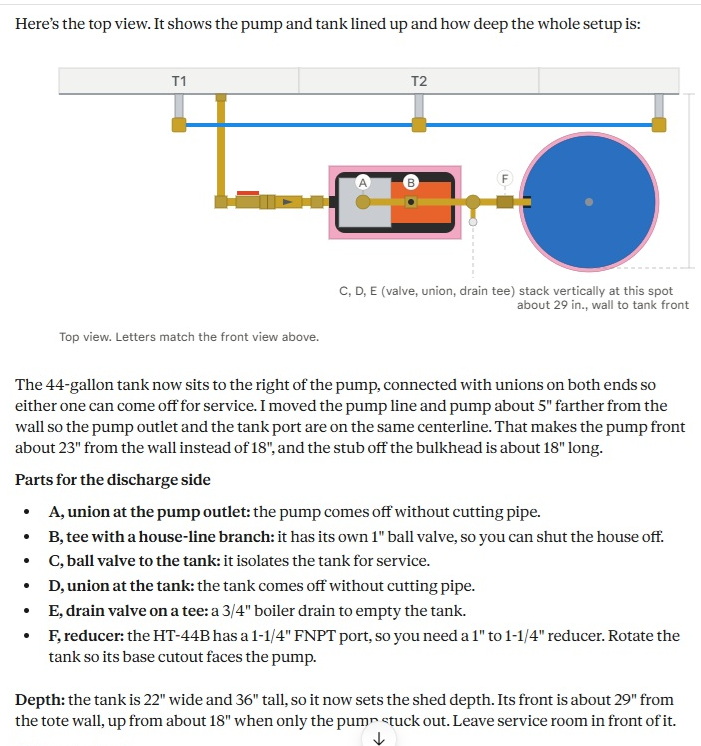
My latest layout uses the eight tote bottom outlets tied into a common manifold. T1's 1-inch bulkhead fitting feeds the pump's horizontal 1-inch inlet. The pump discharge then reaches a tee: one branch serves the blue 44-gallon pressure tank, and the other branch continues to the house. The tank branch is shown with a service shutoff and union; the house branch has its own shutoff.

Homeowner-provided front view schematic of the pump discharge, tee, isolation valves, union, drain and 44-gallon tankHomeowner-provided top view schematic showing pump and pressure tank alignment

These are the homeowner's own layout diagrams and are included as design references. They describe the intended flow path, not a fitting-by-fitting installation drawing. A licensed plumber should verify valve order, check-valve requirements, pressure-switch/gauge location, tank precharge, relief provisions, potable-water materials and any cross-connection protection.

Shed decision

Standalone vs. lean-to: same storage goal, different trade-offs

My preference is the lean-to because it can use less lumber and siding when the house wall can safely serve as one side. A standalone shed costs more in framing and enclosure materials, but it can be placed independently and does not rely on the house for structural support.

Standalone metal water storage shed concept
Standalone

Independent four-sided structure

  • Needs its own posts, beams, bracing, wall framing and full exterior enclosure.
  • More wall panels, trim and likely more framing lumber.
  • Can be positioned where the site, downspout route and service access work best.
  • Does not transfer roof or wall loads to the house.
  • Often the simpler choice where house attachment, flashing or foundation conditions are uncertain.

Main trade-off: generally higher material cost, but greater independence from the house.
Lean-to metal rainwater shed attached to a stone house, shown in concept rendering
Lean-to

Attached to the house

  • Can reduce one wall's framing and metal siding, and may reduce lumber and construction cost.
  • Uses a house-side ledger or engineered attachment and careful flashing/waterproofing.
  • Must keep roof runoff moving away from the house and foundation.
  • Needs a checked load path for wind uplift, snow/ice, roof weight and stored equipment.
  • Requires careful attention to moisture, condensation, pests and service clearances at the house wall.

Main trade-off: potentially lower material cost, but more care is needed at the house connection.

Decision factorStandaloneLean-to
Framing and siding quantityMore: four walls and independent frameOften less: one side may be shared with house, subject to design
House connectionNoneLedger/attachment, flashing and water management must be designed
Location flexibilityHigherMust be beside a suitable house wall and downspout route
Structural independenceIndependent support systemPart of the load path may depend on the house wall/structure
Maintenance accessCan provide access on all sidesHouse side is less accessible; plan service space carefully
Likely cost directionHigher material quantityPotentially lower materials; connection and flashing add cost
Important roof-slope check: your stated concept is about 8 ft × 14 ft, with a 9-ft front and 8-ft back. Before building a lean-to, confirm which edge is against the house. The roof must drain away from the house—not toward the foundation—and the house-side flashing/ledger detail must be designed accordingly.
Current lean-to concept

Dimensions and framing described in my design notes

These are the dimensions and member sizes I have been discussing. They are a planning description only; final member sizing, connections, bracing and footings must be checked for the actual site loads and local requirements.

Envelope and framing

  • Footprint: approximately 8 ft wide Ă— 14 ft long.
  • Height concept: 9 ft at the front and 8 ft at the back, creating about 1 ft of fall across the 8-ft depth.
  • 4Ă—4Ă—14 beams, with a 4Ă—4 center support post at the front and another at the back as discussed.
  • 2Ă—6Ă—8 rafters at 24-inch spacing, running front-to-back.
  • 2Ă—4Ă—14 purlins at 24-inch spacing, running left-to-right.
  • 29-gauge low-rib metal panels on the roof and walls, with a narrow approximately 2-ft maintenance door on the right side of the front.
  • Concrete footings and approved post bases/anchors sized for local soil, frost, uplift and lateral loads.

Construction details to verify

  • Confirm the roof pitch, panel manufacturer's minimum slope and drainage direction.
  • Confirm rafter span, purlin span, beam sizing, post spacing, bracing and connection hardware.
  • Check footing diameter/depth, uplift anchorage, soil bearing and local frost depth.
  • Frame the 2-ft door opening with proper jambs and header; do not cut a structural post or beam to make the opening.
  • Use metal siding as cladding, not as a substitute for structural framing or bracing.
  • Provide ventilation/condensation control and a clear path to service valves, pump and tanks.

The current website uses your latest 29-gauge exterior-panel preference. Your original PDF mentions 26-gauge panels in its insulation-layer description. Confirm the final gauge with your supplier and use one consistent specification in the material takeoff.

Oklahoma winter protection

Insulation must be continuous, protected and dry

Your blueprint describes a tightly wrapped rigid-fiberglass assembly intended to keep fibers from becoming airborne. I have preserved that method as your documented approach, while flagging items that need product and code verification.

Layer sequence in your submitted blueprint

  1. 1/2-inch wood layer.
  2. 10-mil greenhouse sheeting used as a vapor barrier.
  3. 1-inch Owens Corning 703 rigid fiberglass boards.
  4. 4-oz nonwoven landscape fabric tightly wrapped around the fiberglass; seams stapled and T-Rex taped.
  5. White Styrofoam layer.
  6. Exterior metal panel layer (your latest shed spec says 29-gauge; the PDF says 26-gauge).

Your PDF calls this R-11. The exact assembly R-value has not been independently verified here. Do not advertise R-11 until each layer's published thermal rating, thickness, compression and installation details support it.

Cold-snap and fire-safety notes

  • Seal air leaks and protect the insulation from wind washing, moisture and physical damage.
  • Confirm that the fabric, tapes, foam and vapor-control layer are compatible with the insulation and approved for the intended wall/roof assembly.
  • Foam plastics and exposed insulation may require a code-compliant protective thermal barrier; check with the local building official.
  • Your blueprint lists three 300-W bulbs (900 W total) as backup heat. Treat this as a proposed backup—not an automatically safe unattended heater.
  • Have an electrician specify listed, guarded, thermostatically controlled freeze protection with proper clearances, circuit capacity, GFCI/weather protection where required and a temperature alarm.
  • Do not leave a portable space heater unattended or close to plastic tanks, foam, fabric or stored materials.
Water quality and public health

Clear-looking water is not automatically drinking water

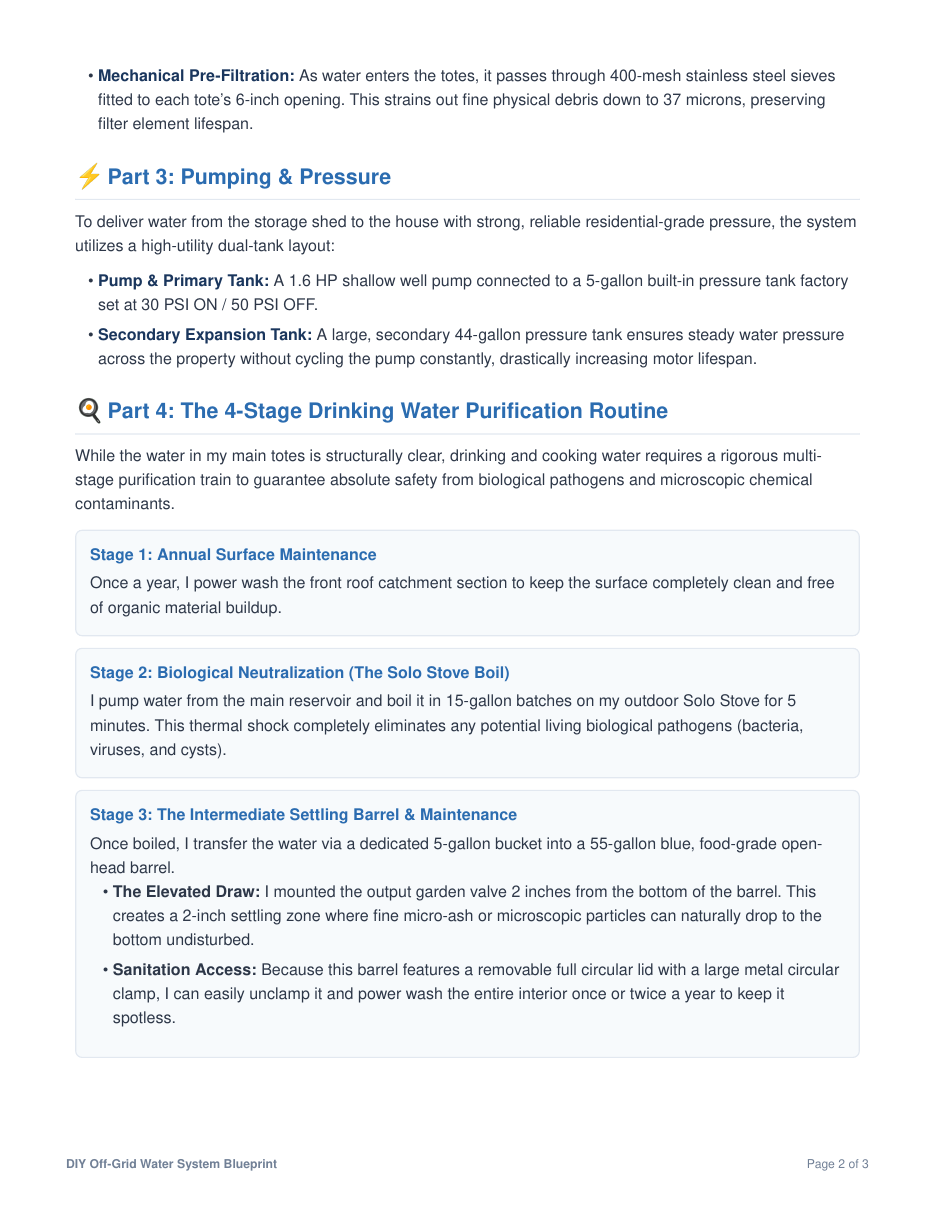
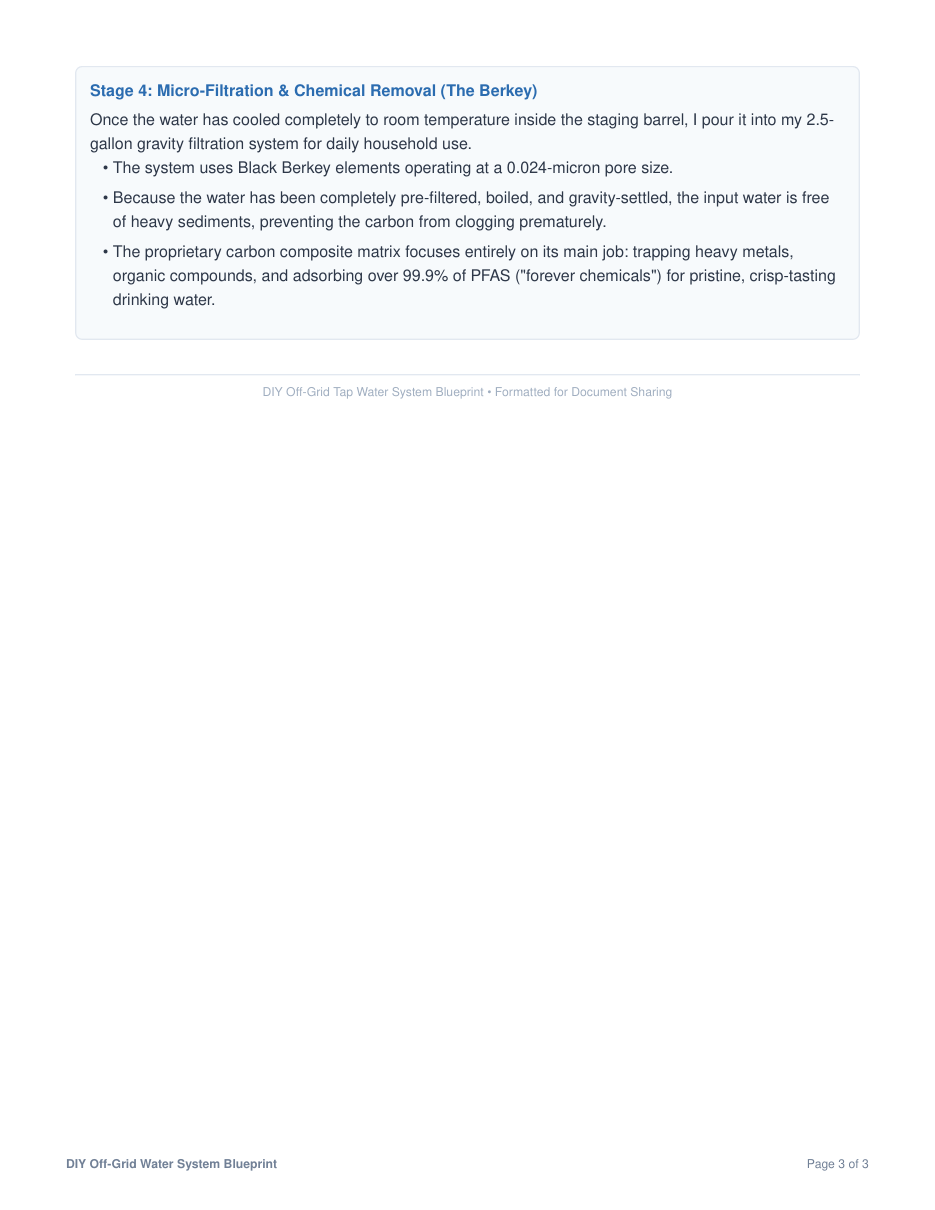
Your blueprint describes a four-stage household routine. This website separates your personal method from what public-health guidance says must be verified.

Your documented four-stage routine

  1. Surface maintenance: annual roof washing and a 30-minute roof rinse before opening the tote lids.
  2. Boiling: your PDF describes boiling 15-gallon batches for five minutes on an outdoor Solo Stove.
  3. Settling: transfer to a 55-gallon blue food-grade barrel and draw from a valve about 2 inches above the bottom.
  4. Final filtration: use your 2.5-gallon gravity filter with the specified elements, following the manufacturer's current instructions.

400-mesh screens are a debris pre-filter; they do not disinfect water or remove dissolved chemicals.

Safety clarifications visitors need

  • CDC says rainwater can contain germs and chemicals from air, roofs, gutters, pipes and storage; test regularly for germs and chemicals if used for drinking, cooking or bathing.
  • A 30-minute roof rinse can remove some accumulated debris, but it does not prove that PFAS or other dissolved chemicals have been removed. A first-flush diverter is worth evaluating.
  • Boiling can kill disease-causing germs, but it does not remove PFAS, metals, fuel or other chemical contaminants.
  • Do not claim a filter removes PFAS unless the exact model has current independent certification for the specific reduction claim. EPA points consumers to NSF/ANSI 53 or 58 listings for PFAS reduction.
  • Test the finished water through a qualified lab and choose treatment based on the results and intended use.
  • Keep rainwater physically separated from municipal plumbing unless an approved, code-compliant cross-connection/backflow arrangement is designed and inspected.
Important: This site does not certify the system as potable. Use a separate, tested drinking-water treatment train, and follow local health-department guidance. The original blueprint's statement about PFAS removal by a named gravity filter is a manufacturer/product claim that must be independently verified for the exact element and current certification.
A flexible DIY planning questionnaire

Every property is different. Start with your property—not someone else's blueprint.

House orientation, roof shape, downspout locations, terrain, available space, water needs and local weather all change the best rainwater design. This expanded questionnaire is intentionally detailed. Skip anything you do not know yet; use the notes fields for unusual layouts.

Start where you are: Answer what you can and leave unknowns blank. You do not need to build the whole system at once; the planner is intended to help you compare a small first phase with a larger future system. Privacy: Your answers stay in this browser. This page does not upload them to a server. Generate a project brief to download and share with a builder, plumber, engineer or ChatGPT. Do not include your exact street address or other sensitive information.

1. Property and location

General location and site conditions help identify climate, code and access questions.

2. Roof and catchment

Do not assume the whole roof drains to one side. Different roof planes may need separate collection plans.

3. Downspouts and collection points

Map each downspout individually when possible. A simple hand sketch or phone photo can be attached when you share the brief.

4. Storage capacity and placement

Include both central storage and any satellite storage so the total potential capacity is clear.

5. Shed location, type and dimensions

Compare a freestanding enclosure with an attached lean-to, but choose based on safe site layout and structural feasibility.

6. Structure, roof and exterior

Record what you have in mind; member sizing and connections still require site-specific verification.

7. Insulation, ventilation and freeze protection

Oklahoma cold snaps can expose weak points such as uninsulated valves, pipe penetrations, doors and air leaks.

8. Plumbing, pumping and household distribution

Identify intended flow paths, pipe sizes and service points. A licensed plumber should verify the final schematic and code requirements.

9. Water quality and intended use

Water-treatment design depends on the source, test results and use. Do not assume clear water is potable.

10. Overflow, drainage and maintenance

Every storage location needs a safe overflow path and access for inspection and cleaning.

11. Budget, labor, permits and project timing

Use local supplier quotes. Separate materials you already own from new purchases.

12. Drawings, photos and final priorities

Attach photos, sketches, roof plans, product labels or water-test reports when you share the generated brief in a conversation. This page itself does not upload attachments.

You can answer only the questions that apply. Unknown answers are fine. The generated brief will label unanswered items as “Not provided.”

Your rainwater project brief

Review this summary, then download it as a text file to keep with your plans or share with a qualified professional.


DIY planning tools

Estimate roof yield and compare shed budgets

These tools are for planning, not a guarantee of rainfall, supply or final construction cost.

Rainwater yield calculator

Formula: roof area Ă— rainfall Ă— 0.623 gallons per square foot per inch Ă— collection efficiency.

Estimated annual collection
48,930 gal
Illustrative estimate; actual collection varies with rainfall, roof losses, first flush, overflow and maintenance.

Storage and autonomy check

Approximate days at full storage
22 days
This simple division does not account for refill, unusable bottom volume, reserve margin or seasonal demand.
Local cost comparison

Enter your supplier quotes to compare real totals

I have not invented a total project price. Quantities and structural details still need a verified takeoff. Enter actual local quotes below; the totals update automatically.

Lean-to estimate

Lean-to total$0

Standalone estimate

Standalone total$0
Difference based on your entered figures
$0
Add supplier quotes to compare the two designs. Include delivery, tax, labor, permits and engineering in your own figures.

Cost lines: framing/posts/beams; footings and anchors; roof panels and trim; wall panels and trim; insulation/air barrier; door and hardware; electrical/freeze protection; house ledger/flashing (lean-to); labor/permits/engineering; miscellaneous. The lean-to may save wall materials, but its attachment and flashing are not free.

Sample online price references (not quotes)

These public listings help establish a starting point only. Confirm exact gauge/profile, length, treatment, freight, tax, availability and local price before budgeting.

  • 29-gauge low-rib panel: Wheeler Metals lists $2.64 per linear foot for its 36-inch-coverage Galvalume low-rib product; availability and price subject to prior sale. Wheeler Metals listing.
  • 29-gauge panels: Middle America Steel lists 29-gauge Ag panel at $2.31/linear foot Galvalume and $2.57/linear foot painted; freight and tax extra. Middle America Steel.
  • 2Ă—6Ă—8 pressure-treated lumber: a Home Depot listing showed $9.58. Local store price and grade may differ. Home Depot example.
  • 2Ă—4Ă—14 lumber: a Home Depot listing showed SYP at $5.82 and SPF options at different prices. Confirm species, grade and treatment. Home Depot example.
  • Owens Corning 703 1-inch rigid fiberglass: one online seller listed a 12-panel 4Ă—2-foot pack (96 sq ft) at $119.95 sale price. This is an acoustic product listing; verify thermal suitability and R-value before specifying it as building insulation. Acoustimac listing.
Original project document

Read the blueprint that started this site

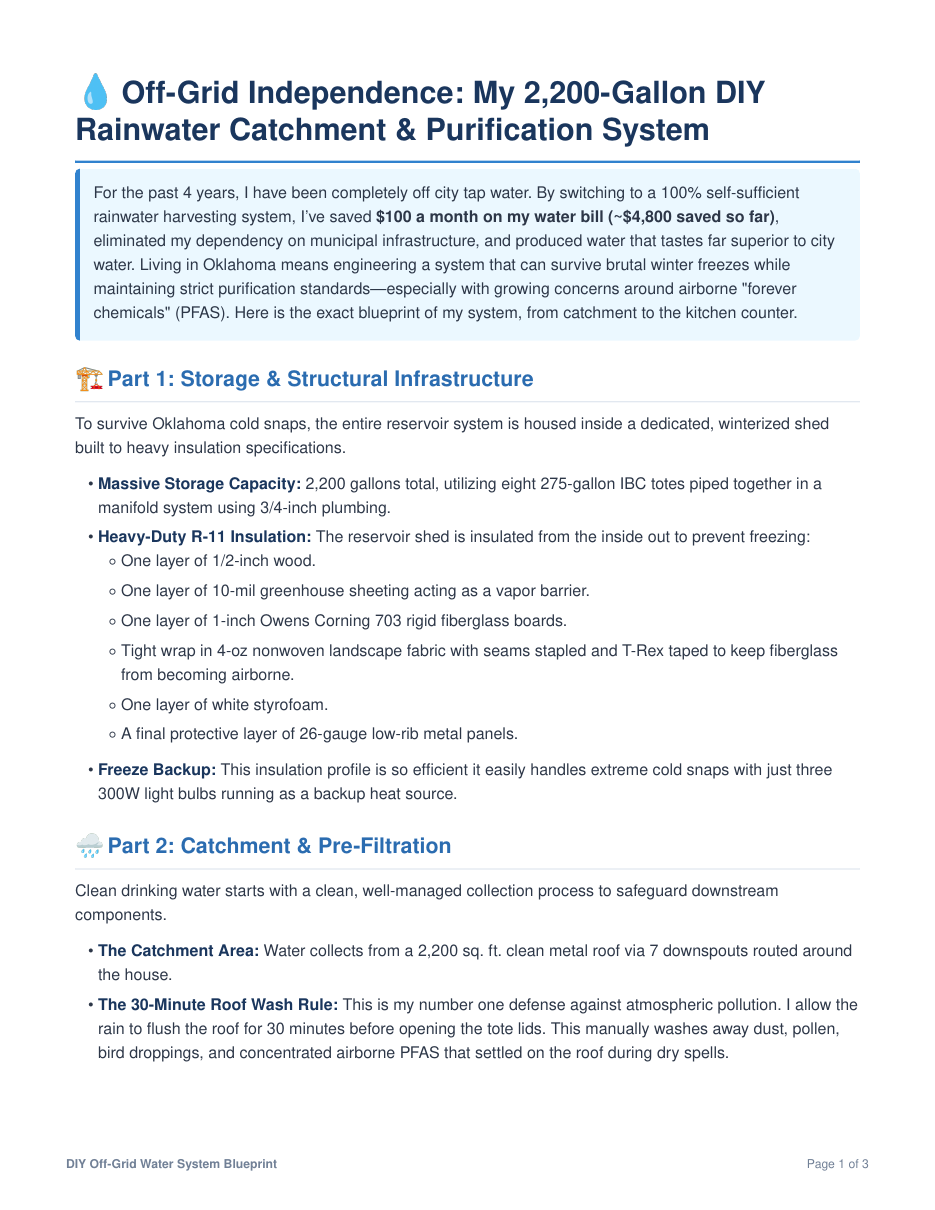
The submitted three-page blueprint is the primary written source for the system details. These page previews and the PDF are provided so visitors can see the original project notes.

Page 1 of the original DIY rainwater system blueprintPage 2 of the original DIY rainwater system blueprintPage 3 of the original DIY rainwater system blueprint

Open / download the original 3-page blueprint

The other shed and reservoir images on this page are AI-generated concept illustrations from the design discussion. They are not photographs of a completed installation. Add actual build photos here when available; those should take priority in the gallery.

Build checklist

Before you buy materials or fill the totes

Structure and site

  • Verify local zoning/building requirements, wind exposure and any snow/ice design loads.
  • Have a qualified builder or engineer check beams, rafters, purlins, posts, bracing, ledger attachment and footings.
  • Confirm slope and flashing keep water away from the house.
  • Confirm the base is level and designed for the full weight of water-filled totes (water alone weighs about 8.34 lb per gallon).
  • Check IBC tote condition, previous contents, support/base requirements and whether stacking is allowed by the tote manufacturer.

Water, electrical and maintenance

  • Use only tanks and plumbing materials suitable for the intended water use; avoid unknown chemical-history totes.
  • Install overflow, insect screens, accessible isolation valves and cleanouts.
  • Have a licensed electrician review the pump and freeze-protection circuit.
  • Test raw and treated water on a regular schedule with a qualified lab.
  • Keep records of filter replacement, cleaning, roof inspection and tank sanitation.
  • Keep rainwater separate from public water piping unless an approved backflow/cross-connection solution is designed and inspected.
Scope: This is a homeowner education and planning website. It is not an engineering design, plumbing permit, electrical plan, public-health certification, product endorsement or guarantee of water availability. Local rules, soil conditions, loads, water tests, product instructions and site conditions control the final design.
Further reading

Sources and references

The personal project details above come from the submitted blueprint and design notes. The following public references are included for safety and code context.